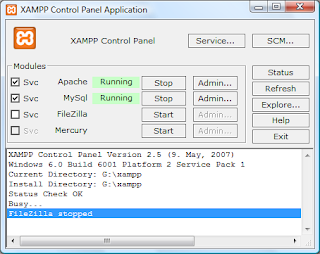
This tutorial shows you two ways of configuring your PHP development environment on the Windows operating system. The first and most convenient way is to install and configure an AMP (Apache, MySQL, PHP) package
Using XAMP Package
Apache HTTP Server
- Download the Apache2 HTTP server.
- Run the installation file .msi. The installation wizard starts. Follow the instructions.
- When the installation is completed, restart the Apache server.
- To check that the installation is successful, run the browser and enter http://localhost/ in browser
The welcome test page should open:
Troubleshoot
By default, the Apache server listens to port 80. This port can be already used by other services, for example Skype. To solve the issue, change the port which the server listens to:- Open the Apache web server configuration file httpd.conf. By default the file is located in C:\Program Files\Apache Software Foundation\Apache<version>\conf\
- Locate the line Listen 80 and change the port number, for example 8080. Save the file.
- Restart the Apache web server.
- To check that the web server works, run the browser and enter the URL and specify the port number explicitly: http://localhost:8080
PHP Engine
- Download the PHP5 engine.
- When the download is complete, run the .msi installation file. The installation wizard starts.
- On the Apache Configuration Directory panel, specify the directory where the httpd.conf file is located, the default setting is C:\Program Files\Apache Software Foundation\Apache<version>\conf\. The PHP processing will be enabled automatically.
- If you want to use the MySQL database server, choose the Complete installation option or select the MySQL and MySQLi items in the Extensions list.
- After the installation is completed, restart the Apache server.
- To check that the PHP engine has been installed successfully and PHP processing has been enabled in the Apache configuration:
- In the Notepad, create a file and type the following text:
<?php echo "PHP has been installed successfully!"; ?>- Save the file in the htdocs folder: C:\Program Files\Apache Software Foundation\Apache<version>\htdocs\test.php
- Run the browser and enter the following URL: http://localhost:<port>/test.php. The following message should appear "PHP has been successfully installed"
Troubleshoot
If the page does not open:- Restart the Apache server.
- Check that the Apache server configuration file httpd.conf contains the following lines:
AddType Application/x-httpd-php .php LoadModule php5_module "c:/php/sapi/php5apache2_2.dll" - If the lines are missing, add them, save httpd.conf, and restart Apache.
- Refresh the http://localhost:<port>/test.php page.
Lastly
- Download XDebug.
- Install XDebug into the php/ folder.
Set Up the Environment
- With default settings, PHP processing will be enabled automatically.
- To attach XDebug to the PHP engine, find the php.ini file and add the following lines to it:For a thread-safe PHP 5.2 engine:
- To be sure that previously installed PHP engine supports using the MySQL database server:
- Click Start > Control Panel.
- On the Control Panel, choose Add or Remove Programs.
- On the Add or Remove Programs panel, select the PHP <version number> area and click Change. The PHP Setup Wizard starts. Click Next.
- On the Change, repair or remove installation panel, choose Change and click Next.
- On the Web Server Setup panel, choose the version of the Apache server - in our example it is Apache 2.2.x Module. Click Next.
- On the Apache Configuration Directory panel, specify the directory where the Apache configuration file httpd.conf is located. Click Next.
- On the Choose Items to Install panel, expand the Extensions node and choose the MySQL and MySQLi items. Click Next.
- On the Ready to change PHP <version number> panel, click Change.
- On the Completed the PHP <version number> Setup Wizard panel, click Finish.
zend_extension_ts="<path to the php folder>/php_xdebug-<version-number>.dll"
xdebug.remote_enable=1
For a non-thread-safe PHP 5.2 engine:
zend_extension_nts="<path to the php folder>/php_xdebug-<version-number>.dll"
xdebug.remote_enable=1
For any PHP 5.3 engine:
zend_extension="<path to the php folder>/php_xdebug-<version-number>.dll"
xdebug.remote_enable=1
Some users also find that they need to include the following lines, although other users do not:
xdebug.remote_host=127.0.0.1
xdebug.remote_port=9000
; Port number must match debugger port number in NetBeans IDE Tools > Options > PHP
xdebug.remote_handler=dbgp
Make sure the paths you specify match the names and locations of the corresponding files as determined during your installation.


Nice php development environment.
ReplyDeletePHP Development Company
This is a good post. This post give truly quality information.I’m definitely going to look into it.Really very useful tips are provided here.thank you so much.Keep up the good works.
ReplyDeleteWeb developer
I admire this article for the well-researched content and excellent wording. I got so involved in this material that I couldn’t stop reading. I am impressed with your work and skill. Thank you so much.It can be helpful for people who wants to know more about app Modernization services.
ReplyDelete