Sunday, 15 January 2012

A Taste of JavaFX Script

The best way to get the flavor of JavaFX Script is to see some examples! Don't worry if some of these don't make sense, the rest of this Reference will provide the details.
JavaFX Script programs are written as one or more scripts. A script consists of expressions and declarations, typically in a file. The following is an expression and thus a valid script:
4
While this is a valid script, it doesn't do anything (other than evaluate the number 4). To make the result appear on the console, we could print the result of the expression using the built-in function 'println':
println(4)
Which makes it irresistible to show the obligatory Hello World script:
println("Hello, World")
This script will, of course, print:
Hello, World
While it was certainly easy to write Hello World in JavaFX Script, this isn't really in the spirit of the language, since it isn't graphical. There is a separate tutorial on using the graphics capabilities of the JavaFX platform;
You can, of course, have more complex expressions:
println("Circumference is { 2*3.1415*7 } ")
This script will print:
Circumference is 43.981
Note the expression enclosed in braces. What is being printed is a string expression. A string representation of the expression in braces is evaluated at runtime. The value of the string expression is the whole string with that string representation replacing the expression in braces. That is { 2*3.1415*7 } is replaced in the string by 43.981 which is the runtime value of { 2*3.1415*7 }.
Better programming style would encourage us to use named variables instead of "magic numbers" in our calculation, which is easy to do:
def PI = 3.14159265; 
var r = 7; 
println("Circumference is { 2 * PI * r } ")
Here PI is defined to always be 3.14159265, while the variable r starts out as 7, but can be changed.
To improve our little script even more, we could also define a function to compute the circumference:
def PI = 3.14159265; 
var r = 7; 
function circumference(radius) { 2 * PI * radius }
println("Circumference is { circumference(r) } ")
The function circumference takes a Number radius as input, and returns the value of the expression 2 * PI * radius.
Note that JavaFX Script uses type inference to figure out the type of variables and function. Type inference means that the compiler figures out the types of variables and functions from context, rather than requiring us to name them explicitly. We are always free to name types explicitly if so desired. With explicit type declarations, this program would be written:
def PI : Number = 3.14159265;  
var r : Number = 7; 
function circumference(radius : Number) : Number {
   2 * PI * radius 
} 
println("Circumference is { circumference(r) }")
Like many other languages, including Java, C++, and Ruby, JavaFX Script allows you to use classes to represent a real or abstract entity. In this case, a point:
class Point { 
   var x : Integer; 
   var y : Integer; 
   function show() {
      println("Point {x}, {y}")
   } 
} 
This class defines an abstract data type for a two-dimensional point, with instance variables to hold its x and y coordinates. It also defines a function to display the state of the Point on the console.
We create an instance of a Point using an object literal, which lets us assign initial values to its instance variables like this:
var myPoint = Point { 
   x: 12
   y: 9
}
This will create a Point whose x and y values are 12 and 9, respectively.
Finally we can ask the point to print itself by calling its show() function (defined, above, in the Point class).
myPoint.show()
This will print:
Point 12, 9
For an example-based introduction to JavaFX, keep in touch with us, more on JavaFX Tutorial soon.
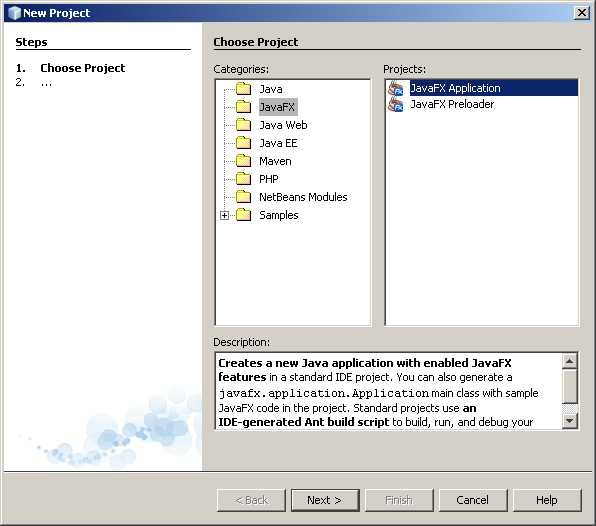
Creating a JavaFX-Enabled Java Platform

NetBeans IDE requires the JavaFX 2.0 platform for Java-enabled to use JavaFX 2.0. This section describes how to create JavaFX 2.0-enabled Java-platform environment IDE NetBeans.
NetBeans IDE with JavaFX attempts to create a Java-enabled platform, when you open a new application or new JavaFX Preloader master for the first time. If the environment IDE NetBeans can not create JavaFX with Java-enabled platform automatically, a warning pops up. In this case, you need to create JavaFX with Java-enabled platform manually. You can create additional supporting Java JavaFX platform, for example, if you want them to use different JDKs Java.
The procedure in this section is divided into two parts to reflect the automatic and manual a platform of creation:
  • Opening of new applications JavaFX Wizard. This is a universal starting point.When you open the wizard, NetBeans IDE with JavaFX attempts to create a Java-enabled platform. If NetBeans is successful, you're done.
  • Creating JavaFX platform with support hand. If the automatic creation of a platform fails, or would like additional JavaFX-enabled platform, you must manually create a platform.

Opening the New JavaFX Application Wizard

The first step in creating a JavaFX-enabled Java platform is to open NetBeans IDE's New JavaFX Application wizard. (You may instead open the New JavaFX Preloader wizard.) If the IDE does not find a JavaFX-enabled Java platform, the IDE attempts to generate a JavaFX-enabled Java platform. If the IDE successfully generates a JavaFX-enabled Java platform, your setup is complete. If the IDE does not generate a JavaFX-enabled Java platform, you must create a platform manually.
To open the New JavaFX Application Wizard:
  1. In the IDE, click the New Project icon (or File>New Project or Ctrl-Shift-N). The New Project wizard opens.

  Select the JavaFX category. Under Projects, select JavaFX Application. Click Next. The Name and Location panel opens. The IDE looks for the JavaFX SDK and attempts to generate a JavaFX-enabled Java platform.
You now see one of two screens, depending on whether or not NetBeans IDE generated a JavaFX-enabled platform:
  • Platform was generated: The IDE generates a JavaFX-enabled Java platform. This JavaFX-enabled platform uses the same JDK sources that the IDE uses by default. The name of the generated platform is Default JFX Platform. The IDE automatically selects this platform. Your setup is complete, unless you want to create an additional JavaFX-enabled Java platform using a different JDK. If you want to create additional JavaFX-enabled Java platforms.
  
Platform was not generated: The JavaFX Platform list does not show any JavaFX-enabled platforms. A warning appears at the bottom of the panel.

Creating a JavaFX-Enabled Platform Manually

You need to create a JavaFX-enabled Java platform manually in the following cases:
  • NetBeans IDE failed to generate a JavaFX-enabled Java platform when you opened the New JavaFX Application or New JavaFX Preloader wizard.
  • You want a JavaFX-enabled platform based on a different Java JDK than the JDK that the IDE uses by default. For example, your IDE uses Java JDK 1.6.0 update 27, but you want to build JavaFX applications using Java 7.
To create a JavaFX-enabled platform manually:
Open the NetBeans IDE Java Platform Manager. You can open the Platform Manager in the following ways:
  • In the New JavaFX Application or New JavaFX Preloader wizard, click Manage Platforms...
  • Expand the Tools menu and select Java Platforms.
  • Open the Project Properties of a Java project. Go to the Libraries page. Click Manage Platforms...
Click Add Platform... The Add Java Platform wizard opens on the Choose Java Platform panel. Browse for your desired JDK.

Select a JDK. You must select JDK 1.6 update 26 or later (or JDK 7). Click Next. The Platform Name panel opens.
Give your new plaform an arbitrary, descriptive name and click Finish. You return to the Platform Manager. The platform you created is listed.
 

Select the platform you created. Open the JavaFX tab for that platform. Currently, JavaFX is not enabled for this platform. Tick the Enable JavaFX box. A warning appears that the JavaFX platform is invalid.

Click Browse next to the JavaFX SDK field. Browse for the JavaFX 2.0 SDK folder.

Click Open. You return to the Java Platform Manager. The JavaFX SDK and JavaFX Javadoc fields are now filled in. If JavaFX Runtime 2.0 is in the same directory as JavaFX 2.0 SDK, the JavaFX Runtime field is also filled in. If JavaFX Runtime is in a different directory than the SDK, browse for the Runtime. You do not need anything in the Sources field.
Click Close if you have values for the JavaFX 2.0 SDK, JavaFX Javadoc, and JavaFX Runtime fields and there is no warning that the JavaFX platform is invalid. Your JavaFX-enabled platform is complete.

If you return to or open the New JavaFX Application wizard, you need to select the JavaFX enabled platform you created. Select the JavaFX 2.0-enabled platform you created from the JavaFX Platform list. If you had a warning that your selected Java platform did not have JavaFX support, that warning disappears.

 
You may either click Finish and create a project, or click Cancel. Your new platform persists even if you cancel the New Project wizard.


Setting Up NetBeans IDE With JavaFX 2.0

JavaFX is a powerful Java-interface platform capable of handling large-scale data-driven applications business. JavaFX 2.0 is a major update to the platform, JavaFX.Starting with this version, developers can create JavaFX applications entirely in Java.
IDE NetBeans supports the creation of applications JavaFX 2.0.
Complete the installation environment IDE NetBeans with JavaFX 2.0 SDK is available on the download site JavaSE. JavaFX SDK is a set of Java-7u2 youdownload from this site. You can also install the NetBeans IDE and the JavaFX 2.0 SDK separately. This document describes how to configure the environment IDE NetBeans with JavaFX 2.0 SDK when you install the IDE and SDK separately.

Installing NetBeans IDE and JavaFX 2.0 SDK


Install JavaFX 2.0 from the JavaFX download site. JavaFX 2.0 requires Java JDK 1.6.0 update 26 or later, or Java 7. JavaFX does not run on all operating systems. Check the JavaFX System Requirements document to see which platforms are supported by JavaFX. The system requirements for JavaFX 2.0 also let you install NetBeans IDE.
Note that when you install JavaFX 2.0 SDK, you actually install two packages: the JavaFX 2.0 SDK and the JavaFX 2.0 Runtime.
If you are using Windows, consider installing JavaFX 2.0 to the default location (C:\Program Files\Oracle\). NetBeans IDE checks the default Windows locations for JavaFX 2.0 SDK and JavaFX 2.0 Runtime. If JavaFX 2.0 is in the default locations, you have less to configure. Also note that if you use the Windows .exe installer, you can change the installation location of the SDK package but not the Runtime package. JavaFX 2.0 Runtime is always installed to the default location by the .exe installer.
Warning: If you have older versions of JavaFX 2.0 (pre-b46) installed on your computer, manually uninstall them and make sure their directories are deleted. The JavaFX installer does not always uninstall older versions of JavaFX 2.0 correctly, which can lead to the wrong version being used. NetBeans IDE does not support earlier versions of JavaFX 2.0.