Showing posts with label netbeans tutorials. Show all posts

Sunday, 15 January 2012

A Taste of JavaFX Script

The best way to get the flavor of JavaFX Script is to see some examples! Don't worry if some of these don't make sense, the rest of this Reference will provide the details.
JavaFX Script programs are written as one or more scripts. A script consists of expressions and declarations, typically in a file. The following is an expression and thus a valid script:
4
While this is a valid script, it doesn't do anything (other than evaluate the number 4). To make the result appear on the console, we could print the result of the expression using the built-in function 'println':
println(4)
Which makes it irresistible to show the obligatory Hello World script:
println("Hello, World")
This script will, of course, print:
Hello, World
While it was certainly easy to write Hello World in JavaFX Script, this isn't really in the spirit of the language, since it isn't graphical. There is a separate tutorial on using the graphics capabilities of the JavaFX platform;
You can, of course, have more complex expressions:
println("Circumference is { 2*3.1415*7 } ")
This script will print:
Circumference is 43.981
Note the expression enclosed in braces. What is being printed is a string expression. A string representation of the expression in braces is evaluated at runtime. The value of the string expression is the whole string with that string representation replacing the expression in braces. That is { 2*3.1415*7 } is replaced in the string by 43.981 which is the runtime value of { 2*3.1415*7 }.
Better programming style would encourage us to use named variables instead of "magic numbers" in our calculation, which is easy to do:
def PI = 3.14159265; 
var r = 7; 
println("Circumference is { 2 * PI * r } ")
Here PI is defined to always be 3.14159265, while the variable r starts out as 7, but can be changed.
To improve our little script even more, we could also define a function to compute the circumference:
def PI = 3.14159265; 
var r = 7; 
function circumference(radius) { 2 * PI * radius }
println("Circumference is { circumference(r) } ")
The function circumference takes a Number radius as input, and returns the value of the expression 2 * PI * radius.
Note that JavaFX Script uses type inference to figure out the type of variables and function. Type inference means that the compiler figures out the types of variables and functions from context, rather than requiring us to name them explicitly. We are always free to name types explicitly if so desired. With explicit type declarations, this program would be written:
def PI : Number = 3.14159265;  
var r : Number = 7; 
function circumference(radius : Number) : Number {
   2 * PI * radius 
} 
println("Circumference is { circumference(r) }")
Like many other languages, including Java, C++, and Ruby, JavaFX Script allows you to use classes to represent a real or abstract entity. In this case, a point:
class Point { 
   var x : Integer; 
   var y : Integer; 
   function show() {
      println("Point {x}, {y}")
   } 
} 
This class defines an abstract data type for a two-dimensional point, with instance variables to hold its x and y coordinates. It also defines a function to display the state of the Point on the console.
We create an instance of a Point using an object literal, which lets us assign initial values to its instance variables like this:
var myPoint = Point { 
   x: 12
   y: 9
}
This will create a Point whose x and y values are 12 and 9, respectively.
Finally we can ask the point to print itself by calling its show() function (defined, above, in the Point class).
myPoint.show()
This will print:
Point 12, 9
For an example-based introduction to JavaFX, keep in touch with us, more on JavaFX Tutorial soon.

Creating a JavaFX-Enabled Java Platform

NetBeans IDE requires the JavaFX 2.0 platform for Java-enabled to use JavaFX 2.0. This section describes how to create JavaFX 2.0-enabled Java-platform environment IDE NetBeans.
NetBeans IDE with JavaFX attempts to create a Java-enabled platform, when you open a new application or new JavaFX Preloader master for the first time. If the environment IDE NetBeans can not create JavaFX with Java-enabled platform automatically, a warning pops up. In this case, you need to create JavaFX with Java-enabled platform manually. You can create additional supporting Java JavaFX platform, for example, if you want them to use different JDKs Java.
The procedure in this section is divided into two parts to reflect the automatic and manual a platform of creation:
  • Opening of new applications JavaFX Wizard. This is a universal starting point.When you open the wizard, NetBeans IDE with JavaFX attempts to create a Java-enabled platform. If NetBeans is successful, you're done.
  • Creating JavaFX platform with support hand. If the automatic creation of a platform fails, or would like additional JavaFX-enabled platform, you must manually create a platform.

Opening the New JavaFX Application Wizard

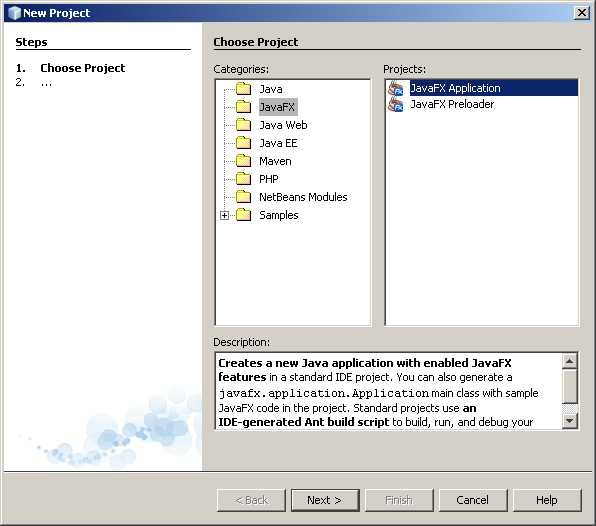
The first step in creating a JavaFX-enabled Java platform is to open NetBeans IDE's New JavaFX Application wizard. (You may instead open the New JavaFX Preloader wizard.) If the IDE does not find a JavaFX-enabled Java platform, the IDE attempts to generate a JavaFX-enabled Java platform. If the IDE successfully generates a JavaFX-enabled Java platform, your setup is complete. If the IDE does not generate a JavaFX-enabled Java platform, you must create a platform manually.
To open the New JavaFX Application Wizard:
  1. In the IDE, click the New Project icon (or File>New Project or Ctrl-Shift-N). The New Project wizard opens.

  Select the JavaFX category. Under Projects, select JavaFX Application. Click Next. The Name and Location panel opens. The IDE looks for the JavaFX SDK and attempts to generate a JavaFX-enabled Java platform.
You now see one of two screens, depending on whether or not NetBeans IDE generated a JavaFX-enabled platform:
  • Platform was generated: The IDE generates a JavaFX-enabled Java platform. This JavaFX-enabled platform uses the same JDK sources that the IDE uses by default. The name of the generated platform is Default JFX Platform. The IDE automatically selects this platform. Your setup is complete, unless you want to create an additional JavaFX-enabled Java platform using a different JDK. If you want to create additional JavaFX-enabled Java platforms.
  
Platform was not generated: The JavaFX Platform list does not show any JavaFX-enabled platforms. A warning appears at the bottom of the panel.

Creating a JavaFX-Enabled Platform Manually

You need to create a JavaFX-enabled Java platform manually in the following cases:
  • NetBeans IDE failed to generate a JavaFX-enabled Java platform when you opened the New JavaFX Application or New JavaFX Preloader wizard.
  • You want a JavaFX-enabled platform based on a different Java JDK than the JDK that the IDE uses by default. For example, your IDE uses Java JDK 1.6.0 update 27, but you want to build JavaFX applications using Java 7.
To create a JavaFX-enabled platform manually:
Open the NetBeans IDE Java Platform Manager. You can open the Platform Manager in the following ways:
  • In the New JavaFX Application or New JavaFX Preloader wizard, click Manage Platforms...
  • Expand the Tools menu and select Java Platforms.
  • Open the Project Properties of a Java project. Go to the Libraries page. Click Manage Platforms...
Click Add Platform... The Add Java Platform wizard opens on the Choose Java Platform panel. Browse for your desired JDK.

Select a JDK. You must select JDK 1.6 update 26 or later (or JDK 7). Click Next. The Platform Name panel opens.
Give your new plaform an arbitrary, descriptive name and click Finish. You return to the Platform Manager. The platform you created is listed.
 

Select the platform you created. Open the JavaFX tab for that platform. Currently, JavaFX is not enabled for this platform. Tick the Enable JavaFX box. A warning appears that the JavaFX platform is invalid.

Click Browse next to the JavaFX SDK field. Browse for the JavaFX 2.0 SDK folder.

Click Open. You return to the Java Platform Manager. The JavaFX SDK and JavaFX Javadoc fields are now filled in. If JavaFX Runtime 2.0 is in the same directory as JavaFX 2.0 SDK, the JavaFX Runtime field is also filled in. If JavaFX Runtime is in a different directory than the SDK, browse for the Runtime. You do not need anything in the Sources field.
Click Close if you have values for the JavaFX 2.0 SDK, JavaFX Javadoc, and JavaFX Runtime fields and there is no warning that the JavaFX platform is invalid. Your JavaFX-enabled platform is complete.

If you return to or open the New JavaFX Application wizard, you need to select the JavaFX enabled platform you created. Select the JavaFX 2.0-enabled platform you created from the JavaFX Platform list. If you had a warning that your selected Java platform did not have JavaFX support, that warning disappears.

 
You may either click Finish and create a project, or click Cancel. Your new platform persists even if you cancel the New Project wizard.


Launch a JavaFX Application

NAME

javafx - JavaFX Launch Utility

Synopsis

javafx [options] class [argument]
javafx [options] -jar jarfile [argument] 
javafxw [options] class [argument] (Windows only)
javafxw [options] -jar jarfile [argument] (Windows only)

options
Command-line options.
class
Name of the class to be invoked.
jarfile
Name of the jar file to be invoked. Used only with -jar.
argument
Argument passed to the main function.

Description

javafx launches a JavaFX Script application. This command sets the application's classpaths and then invokes the java command to launch the application.
The javafxw command is available on Windows only. This command is identical to javafx, except that with javafxw there is no associated console window. Use javafxw when you don't want a command prompt window to appear. The javafxw launcher will, however, display a dialog box with error information if a launch fails for some reason.

Sunday, 1 January 2012

DBMS_JAVA Package

This chapter provides a description of the DBMS_JAVA package. Use these entry points to provide methods for accessing RDBMS functionality from Java.
FUNCTION longname (shortname VARCHAR2) RETURN VARCHAR2
Return the full name from a Java schema object. Because Java classes and methods can have names exceeding the maximum SQL identifier length, OracleJVM uses abbreviated names internally for SQL access. This function simply returns the original Java name for any (potentially) truncated name. An example of this function is to print the fully qualified name of classes that are invalid:
select dbms_java.longname (object_name) from user_objects 
   where object_type = 'JAVA CLASS' and status = 'INVALID';
FUNCTION shortname (longname VARCHAR2) RETURN VARCHAR2

You can specify a full name to the database by using the shortname() routine of the DBMS_JAVA package, which takes a full name as input and returns the corresponding short name. This is useful when verifying that your classes loaded by querying the USER_OBJECTS view.

FUNCTION get_compiler_option(what VARCHAR2, optionName VARCHAR2)
PROCEDURE set_compiler_option(what VARCHAR2, optionName VARCHAR2,
      value VARCHAR2)
PROCEDURE reset_compiler_option(what VARCHAR2, optionName VARCHAR2)
These three entry points control the options of the Oracle Database Java compiler 
that Oracle Database delivers.
FUNCTION resolver (name VARCHAR2, owner VARCHAR2, type VARCHAR2) RETURN VARCHAR2 

This functions returns the resolver specification for a given object name in schema owner where object is of type type. The caller must have EXECUTE privilege and have access to the given object to use this call.
The name parameter is the shortened name for the object. Refer to dbms_java.shortname() for details.
The value of type is one of SOURCE or CLASS.
If there is an error then a null is returned. If the underlying object has changed then a ObjectTypeChangedException may be signaled.
To execute this function:
select dbms_java.resolver('tst', 'SCOTT', 'CLASS') from dual;

which would return:
DBMS_JAVA.RESOLVER('TST','SCOTT','CLASS')
-----------------------------------------
((* SCOTT)(* PUBLIC))
FUNCTION derivedFrom (name VARCHAR2, owner VARCHAR2, type VARCHAR2) RETURN 
VARCHAR2 

This function returns the source name for object name in schema owner where object is of type type. The caller must have EXECUTE privilege and have access to the given object to use this call.
The name parameter (as well as the returned source) is the shortened name for the object. Refer to dbms_java.shortname() for details.
The value of type is of SOURCE or CLASS.
If there is an error then a null is returned. If the underlying object has changed then a ObjectTypeChangedException may be signaled.
The returned value will be null if the object was not compiled in the ojvm.
To execute this function:
select dbms_java.derivedFrom('tst', 'SCOTT', 'CLASS') from dual;

which would return:
DBMS_JAVA.DERIVEDFROM('TST','SCOTT','CLASS')
-----------------------------------------
tst

FUNCTION fixed_in_instance (name VARCHAR2, owner VARCHAR2, type VARCHAR2) RETURN 
NUMBER 

This function returns the permanently kept status for object name in schema owner where the object is of type type. The caller must have EXECUTE privilege and have access to the given object to use this call.
The name parameter is the shortened name for the object. Refer to dbms_java.shortname() for details.
The value of type is of RESOURCE, SOURCE, CLASS, or SHARED_DATA.
The return number is either 0 (not kept) or 1 (kept).
To execute this function:
select dbms_java.fixed_in_instance('tst', 'SCOTT', 'CLASS') from dual;

which would return:
DBMS_JAVA.FIXED_IN_INSTANCE('TST','SCOTT','CLASS')
-----------------------------------------
0

or
select dbms_java.fixed_in_instance('java/lang/String', 'SYS', 'CLASS') from 
dual;

which would return:
DBMS_JAVA.FIXED_IN_INSTANCE('JAVA/LANG/STRING','SYS','CLASS')
-------------------------------------------------------------
1
PROCEDURE set_output (buffersize NUMBER)

This procedure redirects the output of Java stored procedures and triggers to the DBMS_OUTPUT package.
PROCEDURE start_debugging(host varchar2, port number, timeout number)
PROCEDURE stop_debugging
PROCEDURE restart_debugging(timeout number)

These entry points start and stop the debug agent when debugging.
procedure export_source(name varchar2, schema varchar2, blob BLOB) 
procedure export_source(name varchar2, blob BLOB) 
procedure export_source(name varchar2, CLOB clob) 

procedure export_class(name varchar2, schema varchar2, blob BLOB) 
procedure export_class(name varchar2, blob BLOB) 
procedure export_resource(name varchar2, schema varchar2, blob BLOB) 
procedure export_resource(name varchar2, blob BLOB) 
procedure export_resource(name varchar2, schema varchar2, clob CLOB) 
procedure export_resource(name varchar2, clob CLOB) 

These entry points export a Java source, class, or resource schema object into an Oracle large object (LOB).
In all cases, name is the name of the Java schema object to be exported, schema is the name of the schema owning the object (if not supplied, then the current schema is used), and blob|clob is the large object that receives the specified Java schema object.
You cannot export a class into a CLOB, only into a BLOB. In addition, the internal representation of the source uses the UTF8 format, so that format is used to store the source in the BLOB as well.
PROCEDURE loadjava(options varchar2)
PROCEDURE loadjava(options varchar2, resolver varchar2)
PROCEDURE dropjava(options varchar2)

These procedures allow you to load and drop classes within the database using a call, rather than through the loadjava or dropjava command-line tools. To execute within your Java application, do the following:
call dbms_java.loadjava('... options...');
call dbms_java.dropjava('... options...');

The options are identical to those specified for the loadjava and dropjava command-line tools. Each option should be separated by a blank. Do not separate the options with a comma. The only exception to this is the loadjava -resolver option, which contains blanks. For -resolver, specify all other options first, separate these options by a comma, and then specify the -resolver options, as follows:
call dbms_java.loadjava('... options...', 'resolver_options');

Do not specify the following options, because they relate to the database connection for the loadjava command-line tool: -thin, -oci, -user, -password. The output is directed to System.err. The output typically goes to a trace file, but can be redirected.
For more information on the available options.
PROCEDURE grant_permission( grantee varchar2,
         permission_type varchar2,
        permission_name varchar2,
         permission_action varchar2 )
PROCEDURE restrict_permission( grantee varchar2,
         permission_type varchar2,
        permission_name varchar2,
         permission_action varchar2)
PROCEDURE grant_policy_permission( grantee varchar2,
         permission_schema varchar2,
         permission_type varchar2,
        permission_name varchar2)
PROCEDURE revoke_permission(permission_schema varchar2,
         permission_type varchar2,
        permission_name varchar2,
        permission_action varchar2)
PROCEDURE disable_permission(key number)
PROCEDURE enable_permission(key number)
PROCEDURE delete_permission(key number)

These entry points control the JVM permissions.
procedure set_preference(user varchar2,type varchar2, abspath varchar2, key 
varchar2, value varchar2) 

This procedure inserts or updates a row in the SYS:java$prefs$ table as follows:
call dbms_java.set_preference('SCOTT','U','/my/package/method/three',
'windowsize','22:32');

The following table identifies the valid values for each parameter in this procedure.
ParameterDescription
user
The schema name to which to attach the preference. If the login schema is not SYS, then user must be the current login schema, or the insert will fail.
type
Select the type of preference:
  • U = user preference
  • S = System preference
abspath
The absolute path for the preference.
key
The key value to be used for the lookup or the value name
value
The value of the preference key.