NetBeans IDE requires the JavaFX 2.0 platform for Java-enabled to use JavaFX 2.0. This section describes how to create JavaFX 2.0-enabled Java-platform environment IDE NetBeans.
NetBeans IDE with JavaFX attempts to create a Java-enabled platform, when you open a new application or new JavaFX Preloader master for the first time. If the environment IDE NetBeans can not create JavaFX with Java-enabled platform automatically, a warning pops up. In this case, you need to create JavaFX with Java-enabled platform manually. You can create additional supporting Java JavaFX platform, for example, if you want them to use different JDKs Java.
The procedure in this section is divided into two parts to reflect the automatic and manual a platform of creation:
- Opening of new applications JavaFX Wizard. This is a universal starting point.When you open the wizard, NetBeans IDE with JavaFX attempts to create a Java-enabled platform. If NetBeans is successful, you're done.
- Creating JavaFX platform with support hand. If the automatic creation of a platform fails, or would like additional JavaFX-enabled platform, you must manually create a platform.
Opening the New JavaFX Application Wizard
The first step in creating a JavaFX-enabled Java platform is to open NetBeans IDE's New JavaFX Application wizard. (You may instead open the New JavaFX Preloader wizard.) If the IDE does not find a JavaFX-enabled Java platform, the IDE attempts to generate a JavaFX-enabled Java platform. If the IDE successfully generates a JavaFX-enabled Java platform, your setup is complete. If the IDE does not generate a JavaFX-enabled Java platform, you must create a platform manually.
To open the New JavaFX Application Wizard:
- In the IDE, click the New Project icon (or File>New Project or Ctrl-Shift-N). The New Project wizard opens.
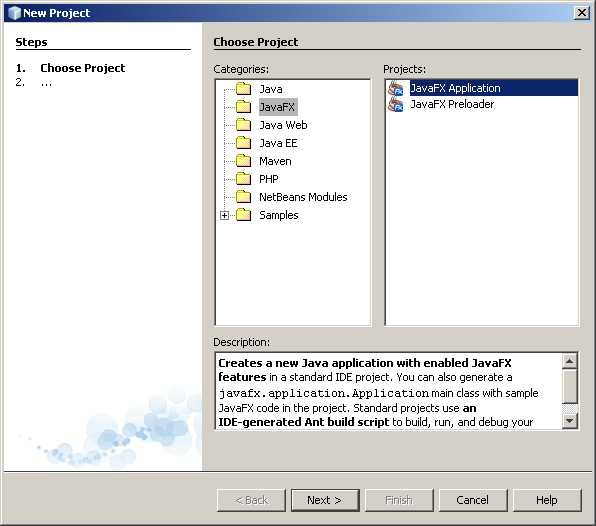 Select the JavaFX category. Under Projects, select JavaFX Application. Click Next. The Name and Location panel opens. The IDE looks for the JavaFX SDK and attempts to generate a JavaFX-enabled Java platform.
You now see one of two screens, depending on whether or not NetBeans IDE generated a JavaFX-enabled platform:
- Platform was generated: The IDE generates a JavaFX-enabled Java platform. This JavaFX-enabled platform uses the same JDK sources that the IDE uses by default. The name of the generated platform is Default JFX Platform. The IDE automatically selects this platform. Your setup is complete, unless you want to create an additional JavaFX-enabled Java platform using a different JDK. If you want to create additional JavaFX-enabled Java platforms.

Platform was not generated: The JavaFX Platform list does not show any JavaFX-enabled platforms. A warning appears at the bottom of the panel.

Creating a JavaFX-Enabled Platform Manually
You need to create a JavaFX-enabled Java platform manually in the following cases:
- NetBeans IDE failed to generate a JavaFX-enabled Java platform when you opened the New JavaFX Application or New JavaFX Preloader wizard.
- You want a JavaFX-enabled platform based on a different Java JDK than the JDK that the IDE uses by default. For example, your IDE uses Java JDK 1.6.0 update 27, but you want to build JavaFX applications using Java 7.
To create a JavaFX-enabled platform manually:
Open the NetBeans IDE Java Platform Manager. You can open the Platform Manager in the following ways:- In the New JavaFX Application or New JavaFX Preloader wizard, click Manage Platforms...
- Expand the Tools menu and select Java Platforms.
- Open the Project Properties of a Java project. Go to the Libraries page. Click Manage Platforms...

Select a JDK. You must select JDK 1.6 update 26 or later (or JDK 7). Click Next. The Platform Name panel opens.

Give your new plaform an arbitrary, descriptive name and click Finish. You return to the Platform Manager. The platform you created is listed.

Select the platform you created. Open the JavaFX tab for that platform. Currently, JavaFX is not enabled for this platform. Tick the Enable JavaFX box. A warning appears that the JavaFX platform is invalid.
Click Browse next to the JavaFX SDK field. Browse for the JavaFX 2.0 SDK folder.

Click Open. You return to the Java Platform Manager. The JavaFX SDK and JavaFX Javadoc fields are now filled in. If JavaFX Runtime 2.0 is in the same directory as JavaFX 2.0 SDK, the JavaFX Runtime field is also filled in. If JavaFX Runtime is in a different directory than the SDK, browse for the Runtime. You do not need anything in the Sources field.
Click Close if you have values for the JavaFX 2.0 SDK, JavaFX Javadoc, and JavaFX Runtime fields and there is no warning that the JavaFX platform is invalid. Your JavaFX-enabled platform is complete.

If you return to or open the New JavaFX Application wizard, you need to select the JavaFX enabled platform you created. Select the JavaFX 2.0-enabled platform you created from the JavaFX Platform list. If you had a warning that your selected Java platform did not have JavaFX support, that warning disappears.

You may either click Finish and create a project, or click Cancel. Your new platform persists even if you cancel the New Project wizard.
Please write a post regarding the javaFx application packaging...........
ReplyDeletethank you,
nithin
http://www.pickmyhostel.com/
Thanks for the post, I am techno savvy. I believe you hit the nail right on the head. I am highly impressed with your blog. It is very nicely explained. Your article adds best knowledge to our Java Online Training from India.
ReplyDelete